
Cnc Taper & Radius Pro
Contains ads

500+
Downloads

Everyone
info


About this app
One time payment for lifetime free updates and New Options also free
Using the chamfering function in the place where the CNC machining center is used for chamfering and rounding can simplify the program, not only can reduce the programming workload, but also reduce the probability of errors when using the CNC machining center to make plastic or metal aluminum machining parts.
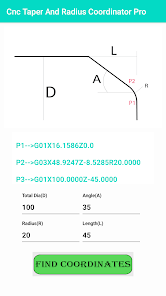
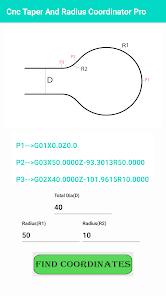
How To Program A Radius On A CNC Lathe?
To program a radius on a CNC lathe, you need to know how to work with the machine’s control system. There are two options:
– Using the program editor
– Using the G Code Editor
In terms of ease of use, G Code editor is preferable, with this knowledge, you can create any kind of motion with your program.
Automatic chamfering C and automatic rounding R tutorial for CNC lathe:
Automatic chamfering C and automatic rounding R
Project command tool movement chamfer C
G01 X.Z()…C(+)
G01 X30. Z-20.
G01 X50. C2.
G01 Z0 This block, move to the X axis
Place a single block and move to the positive (+) direction of the Z axis Chamfer C
G01 X.Z()…C(-)
G01 X30. Z-20.
G01 X50. C-2.
G01 Z-30. This block, move to the X axis
Place a single block and move to the positive (-) direction of the Z axis Chamfer C
G01 X.Z()…C(+)
G01 X30. Z0
G01 Z-30. C2.
G01 X50. This block, move to the Z axis
Place a single block and move to the negative (+) direction of the X axis Chamfer C
G01 X.Z()…C(-)
G01 X30. Z0
G01 Z-30. C-2.
G01 X20. This block, move to the Z axis
Place a single block, move the X axis in the positive (-) direction Chamfer C
G1 X…R(+)G01 X30. Z-20.
G01 X50. R2.
G01 Z0. This block, move to the X axis
Place a single block, move to the positive (+) direction of the X axis, round corner R
G01 X…R(-)
G01 X30. Z-20
G01 X50. R-2.
G01 Z-30. This block, move to the X axis
Place a single section, move to the negative (-) direction of the Z axis, round corner R
G01 Z…R(+)
G01 X30. Z0
G01 Z-30. R2.
G01 X50. This single block, move to the Z axis direction
Place a single section and move to the positive (+) direction of the X axis
Round R
G01 Z…R(-)
G01 X30. Z0
G01 Z-30. R-2.
G01 X20. This block, move to the Z axis
Place a single block, move to the negative (-) direction of the X axis, C and R usually specify a radius value
Front slope or chamfer Turning arc R radius External angle (greater than 180 degrees) External arc + tool nose radius Internal angle (less than 180 degrees) External arc-tool nose radius
It is much easier to calculate the absolute XY coordinates for a simple contour, such as a rectangle, but it is much harder to calculate points where the contour includes angles and partial radiuses. These parts are usually programmed with the assistance of a CAD/CAM system (CAM), but if such system is not available or in other situations, the CNC programmer must resort to the old fashion way, by using a pocket calculator. Most calculations will be using trigonometric functions, but knowing the basic arithmetic and algebraic operations, knowing formulas, being familiar with solving triangles is still the major requirement. This chapter will present some techniques that have proven to be suitable for solving a majority of problems associated with calculation of more difficult contour points.
Tools and Knowledge
Any tool can only be used correctly if the user has a sufficient amount of knowledge about the purpose of the tool and how to use such a tool. In CNC manual programming, we are talking about three major tools pencil, paper, and a calculator. An old cartoon has also shown a fourth tool a very large eraser. Of course, in these days, pencil is most likely replaced by a text editor (even Windows Notepad will do in an emergency), and actual printing on paper is not always necessary, as the program can be transferred to the control system via a cable, using DNC software. Eraser is part of the editor, and Windows even provide a simple calculator. In practice, a physical..
Using the chamfering function in the place where the CNC machining center is used for chamfering and rounding can simplify the program, not only can reduce the programming workload, but also reduce the probability of errors when using the CNC machining center to make plastic or metal aluminum machining parts.
How To Program A Radius On A CNC Lathe?
To program a radius on a CNC lathe, you need to know how to work with the machine’s control system. There are two options:
– Using the program editor
– Using the G Code Editor
In terms of ease of use, G Code editor is preferable, with this knowledge, you can create any kind of motion with your program.
Automatic chamfering C and automatic rounding R tutorial for CNC lathe:
Automatic chamfering C and automatic rounding R
Project command tool movement chamfer C
G01 X.Z()…C(+)
G01 X30. Z-20.
G01 X50. C2.
G01 Z0 This block, move to the X axis
Place a single block and move to the positive (+) direction of the Z axis Chamfer C
G01 X.Z()…C(-)
G01 X30. Z-20.
G01 X50. C-2.
G01 Z-30. This block, move to the X axis
Place a single block and move to the positive (-) direction of the Z axis Chamfer C
G01 X.Z()…C(+)
G01 X30. Z0
G01 Z-30. C2.
G01 X50. This block, move to the Z axis
Place a single block and move to the negative (+) direction of the X axis Chamfer C
G01 X.Z()…C(-)
G01 X30. Z0
G01 Z-30. C-2.
G01 X20. This block, move to the Z axis
Place a single block, move the X axis in the positive (-) direction Chamfer C
G1 X…R(+)G01 X30. Z-20.
G01 X50. R2.
G01 Z0. This block, move to the X axis
Place a single block, move to the positive (+) direction of the X axis, round corner R
G01 X…R(-)
G01 X30. Z-20
G01 X50. R-2.
G01 Z-30. This block, move to the X axis
Place a single section, move to the negative (-) direction of the Z axis, round corner R
G01 Z…R(+)
G01 X30. Z0
G01 Z-30. R2.
G01 X50. This single block, move to the Z axis direction
Place a single section and move to the positive (+) direction of the X axis
Round R
G01 Z…R(-)
G01 X30. Z0
G01 Z-30. R-2.
G01 X20. This block, move to the Z axis
Place a single block, move to the negative (-) direction of the X axis, C and R usually specify a radius value
Front slope or chamfer Turning arc R radius External angle (greater than 180 degrees) External arc + tool nose radius Internal angle (less than 180 degrees) External arc-tool nose radius
It is much easier to calculate the absolute XY coordinates for a simple contour, such as a rectangle, but it is much harder to calculate points where the contour includes angles and partial radiuses. These parts are usually programmed with the assistance of a CAD/CAM system (CAM), but if such system is not available or in other situations, the CNC programmer must resort to the old fashion way, by using a pocket calculator. Most calculations will be using trigonometric functions, but knowing the basic arithmetic and algebraic operations, knowing formulas, being familiar with solving triangles is still the major requirement. This chapter will present some techniques that have proven to be suitable for solving a majority of problems associated with calculation of more difficult contour points.
Tools and Knowledge
Any tool can only be used correctly if the user has a sufficient amount of knowledge about the purpose of the tool and how to use such a tool. In CNC manual programming, we are talking about three major tools pencil, paper, and a calculator. An old cartoon has also shown a fourth tool a very large eraser. Of course, in these days, pencil is most likely replaced by a text editor (even Windows Notepad will do in an emergency), and actual printing on paper is not always necessary, as the program can be transferred to the control system via a cable, using DNC software. Eraser is part of the editor, and Windows even provide a simple calculator. In practice, a physical..
Updated on
Safety starts with understanding how developers collect and share your data. Data privacy and security practices may vary based on your use, region, and age. The developer provided this information and may update it over time.

No data shared with third parties
Learn more about how developers declare sharing

No data collected
Learn more about how developers declare collection
What's new
What's New
1. ID Options Included
2. 5 New Options Added
3. One Time Payment For Lifetime Free All Updates
4. New Drawings
1. ID Options Included
2. 5 New Options Added
3. One Time Payment For Lifetime Free All Updates
4. New Drawings


